Simple Steps: How to Add the HubSpot Extension to Gmail
Author: Thaha
Last Updated on:
Introduction
HubSpot's Chrome Extension is a good tool to improve your experience of using HubSpot with Gmail. In this guide, I'll show you how to set it up and get the most out of it.
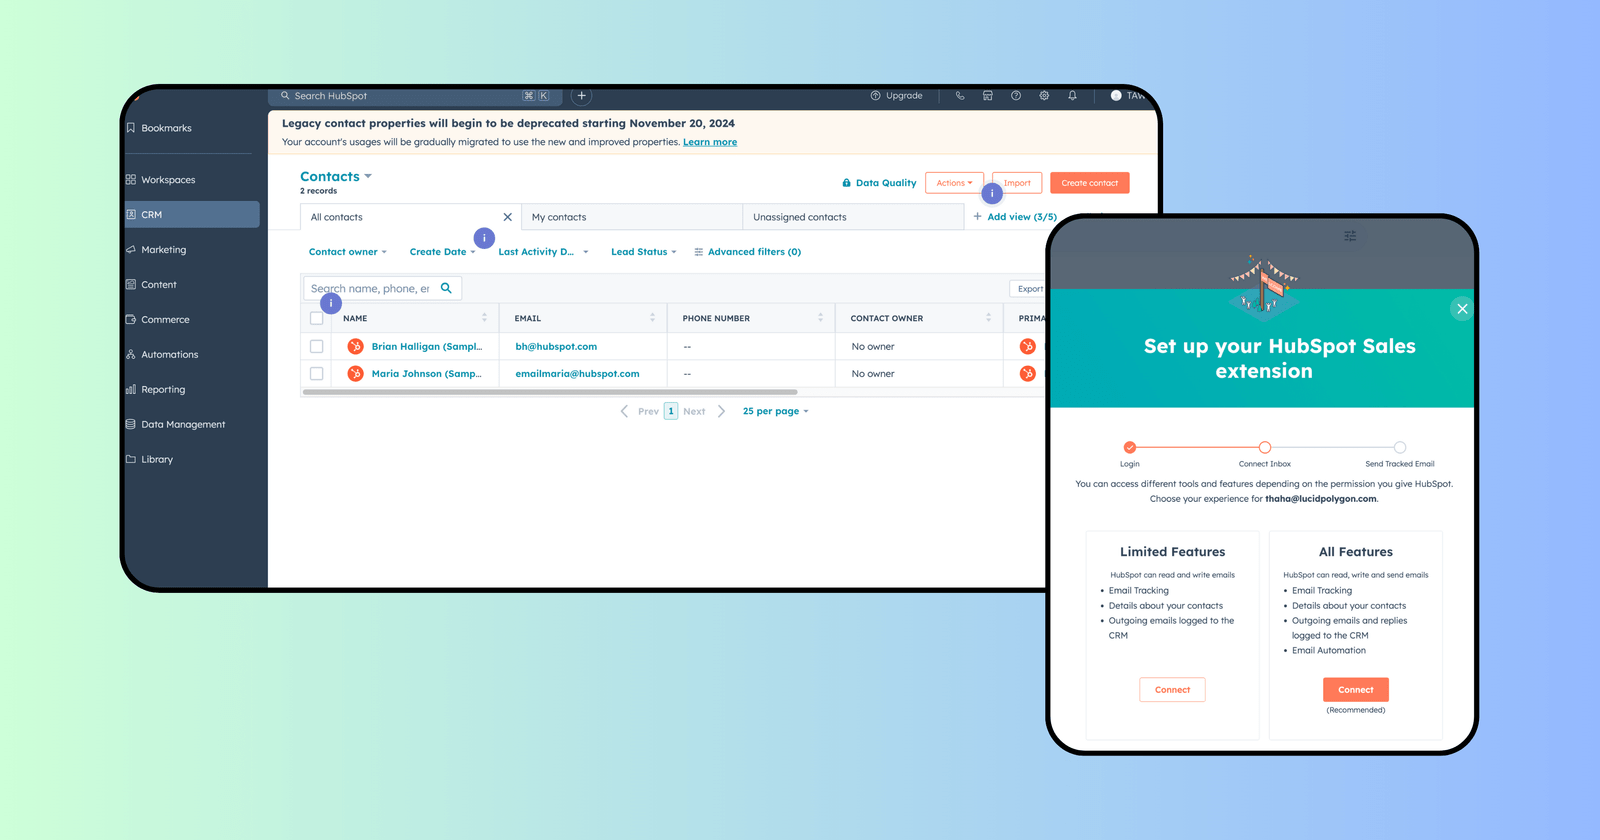
Step 1: Install the Extension
Let's get started by adding the HubSpot Sales extension to Chrome:
- Here's a link to the Hubspot extension. Click it. And click to install it.
- Make sure you are signed into the right Gmail account.
- Click "Add to Chrome".
- Review the permissions and click "Add extension" to confirm.
- Log into your HubSpot Sales account when prompted.
Want to stay in the loop? Set up browser notifications:
- Click the HubSpot extension icon in your Chrome toolbar.
- Select "Notification Settings."
- Choose which notifications you want, like email opens or new lead alerts.
By bringing HubSpot into Gmail, you're cutting down on tab-hopping and focusing on what really matters – building relationships and closing deals.
Step 2: Configure Your Extension Settings for Maximum Efficiency
Now that you've got the extension installed, let's make it work for you:
- Click the HubSpot icon in your Chrome toolbar.
- Select "Extension Settings" from the dropdown.
In the settings panel, customize these options:
- Email tracking: Decide if you want to track opens and clicks by default.
- Email logging: Set your preferences for auto-logging emails to HubSpot.
- Default associations: Choose how new contacts and deals should be linked.
- Sidebar layout: Pick what info shows up in your Gmail sidebar.
Here's a quick tip: If you're in B2B sales, think about auto-logging all your communications with target accounts. This way, you won’t miss a thing with your key prospects.
One good thing about this extension is that it fits very well with your workflow. Do trial and error until you discover what suits you best.
Step 3: Leverage Contact Profiles for Instant Context
This extension lets your see rich contact profiles right in Gmail. Here's how to use it:
- Open an email from a contact in Gmail.
- Look for the HubSpot sidebar on the right.
- You'll see tons of useful info about your contact, including:
- Basic details
- Recent interactions
- Associated deals and their stages
- Related tasks
- Company info (for B2B contacts)
But it's not just about looking at info – you can take action too:
- Edit contact details by clicking the pencil icon next to any field.
- Need to create a task? Just click the "+" button in the Tasks section.
- Want to start a new deal? Look for the "Create deal" button.
Imagine getting an email confirming a successful demo. Instead of switching to your CRM, you can update the deal stage, set a follow-up task, and log the email – all without leaving Gmail. Pretty neat, right?
This instant access to context can really level up your sales game. Before replying to an inquiry, you can quickly check if there are any open support tickets or pending deals, ensuring your response is spot-on.
Step 4: Harness Advanced Sales Tools Within Gmail
The HubSpot Sales extension brings a whole suite of powerful tools right into your Gmail compose window. Let's explore how to use them:
Email Templates:
- When writing an email, click the "Templates" button.
- Pick from your saved templates or create a new one on the fly.
- Personalize the template with merge fields for that personal touch.
- Pro tip: Try A/B testing different templates to see what works best.
Sequences:
- Click the "Sequences" button in the compose window.
- Choose a pre-built sequence or create your own.
- Enroll your contact with one click, automating follow-ups.
- Advanced move: Create decision tree sequences based on how recipients respond.
Documents:
- Use the "Documents" button to insert tracked files.
- See when contacts view your docs and how long they look at them.
- Use this info to time your follow-ups perfectly.
Meeting Scheduler:
- Click "Meetings" to insert your scheduling link.
- Let contacts book time with you without the back-and-forth.
- Pro tip: Create different meeting types for various stages of your sales process.
Snippets:
- Save time by inserting frequently used text with the "Snippets" feature.
- Use snippets for common objections, product details, or personalized greetings.
By using these tools in your email workflow, you're not just saving time – you're also ensuring consistency and gaining valuable insights into how prospects engage with your outreach.
Remember, the key is to use these tools together. You might use a template for initial outreach, include a tracked document, and set up a sequence for follow-up – all from a single email compose window.
Step 5: Master Email Tracking and Logging for Strategic Follow-ups
Another great feature is email tracking and logging. They are strategic tools for professional sales people. Here's how to make the most of them:
Tracking Emails:
- When writing an email, look for the "Track" checkbox.
- Turn on tracking to get notifications when your email is opened.
- Use this info to time your follow-ups just right.
- Pro tip: Set up mobile notifications for opens to respond quickly, even when you're on the go.
Logging Emails:
- Find the "Log" checkbox in the compose window.
- Check this to automatically save the email to your contact's HubSpot record.
- All logged emails will show up in the contact's timeline in HubSpot.
- Advanced move: Create workflows in HubSpot that trigger based on logged email content or properties.
Viewing Data:
- Click on the HubSpot extension icon to see recent email activity.
- For more detailed stats, head to your HubSpot dashboard.
- Use this data to spot your most engaged prospects and prioritize your outreach.
Customizing Settings:
- In the extension settings, set up rules for automatic logging.
- For example, you might choose to log all emails except those to certain domains.
- Consider creating a "Do Not Log" list for sensitive internal communications.
By using these features, you're creating a complete record of all client interactions without any extra work. This data becomes super valuable when prioritizing leads, prepping for meetings, or analyzing your sales process for improvements.
For instance, if you notice a prospect has opened your proposal email multiple times, it might be the perfect time to follow up with a call. Or, if you see a pattern of prospects engaging more with certain types of content, you can tweak your sales strategy accordingly.
Step 6: Troubleshoot HubSpot-Specific Issues
Even the best tools can sometimes act up. Here are some quick fixes for common HubSpot extension issues:
Sync Problems:
- If data isn't syncing between Gmail and HubSpot, try disconnecting and reconnecting your Gmail account in HubSpot settings.
- Clear your browser cache and restart Chrome.
Extension Not Loading:
- Check if you're logged into the right HubSpot account.
- Turn the extension off and on again in Chrome's settings.
- Make sure you're using the latest version of Chrome and the HubSpot extension.
Tracking Not Working:
- Check that your email domain is set up correctly in HubSpot for tracking.
- See if your recipient's email client is blocking tracking pixels.
Performance Issues:
- If Gmail seems slow with the extension, try turning off other extensions temporarily.
- Use Chrome's task manager to see if the HubSpot extension is using too many resources.
Template or Sequence Errors:
- If templates or sequences aren't loading, refresh your HubSpot cache in the extension settings.
- Make sure you have the right permissions in your HubSpot account to use these features.
Remember, most issues can be fixed with a simple refresh or by clearing your cache. If problems stick around, HubSpot's support team is always there to help, and their knowledge base is full of great troubleshooting guides.
Conclusion
Hubspot Chrome Extension like many other productivity chrome extensions helps you be more efficient at your work. Here your inbox becomes a CRM center. Note that, the key to getting the most out of it is to use it consistently and customize it to fit your needs.
Hubspot also has another social chrome extension that you can checkout to enhance your Hubspot efficiency.
FAQs
Is the HubSpot Sales Chrome extension free?
The basic version is free, but some advanced features need a paid HubSpot subscription. Free users can track up to 200 email opens per month, while paid plans offer unlimited tracking.Can I use the extension with multiple Gmail accounts?
Yes, but you'll need to switch between Gmail accounts in Chrome to use it with different inboxes. Each Gmail account can be linked to a separate HubSpot account if needed.How secure is the data shared between Gmail and HubSpot?
HubSpot uses top-notch encryption and follows GDPR and CCPA rules. All data is sent securely, and you can control what information is synced between platforms.Will the extension slow down my Gmail?
Generally, no. But if you notice any slowdown, try turning off other extensions or clearing your browser cache. HubSpot's extension is designed to be light and efficient.Can I customize which HubSpot features show up in Gmail?
Yes, you can adjust which features and information appear in the extension settings. This lets you create a streamlined experience that fits your workflow.How often does the extension get new features?
HubSpot regularly updates the extension, usually adding new features every few months. Turn on automatic updates in Chrome to make sure you always have the latest version.Is there a limit to how many emails I can track or log?
Limits vary based on your HubSpot plan. Free users can track up to 200 email opens per month, while paid plans offer more generous allowances or unlimited tracking and logging.